Using Thunkable Basics To Build A Powerful App (Showcase App Included)
.png)
Wondering where to get started in your mobile app development journey? Thunkable’s no code app builder transforms the way you can create mobile apps. Imagine making a mobile app without needing to write a single line of code. Whether you are building for your business or an event, a well-designed app can elevate your services to new heights. Thunkable, with its intuitive no code platform, makes this not only possible but accessible for everyone, regardless of their coding expertise.
So, let’s get started!
Getting to Know the Thunkable Platform
Thunkable offers the most comprehensive no code development platform to create your own native mobile apps. Create your free account and begin using the drag and drop app builder. Once you’ve created an account, download the Thunkable Live App, as you'll need this for testing apps. Once you're in, you'll land in the app builder – it's like your personal workshop for crafting apps.
Knowing what you're looking at is important so you can quickly build and customize your app. This guide is your companion in swiftly navigating the Thunkable platform, turning your innovative ideas into functional apps.
Thunkable's interface is thoughtfully designed for ease of use, featuring the Design and Blocks tabs as its core components. Let’s take a closer look at both.
The Design Tab: Unleashing Your Inner Artist
The Design tab is where the visual aspect, or user interface (UI), of your app takes form. Here, various components are at your disposal to craft your app's interface - think of it as the canvas for your digital creation. Drag and drop different components to shape how your app looks.
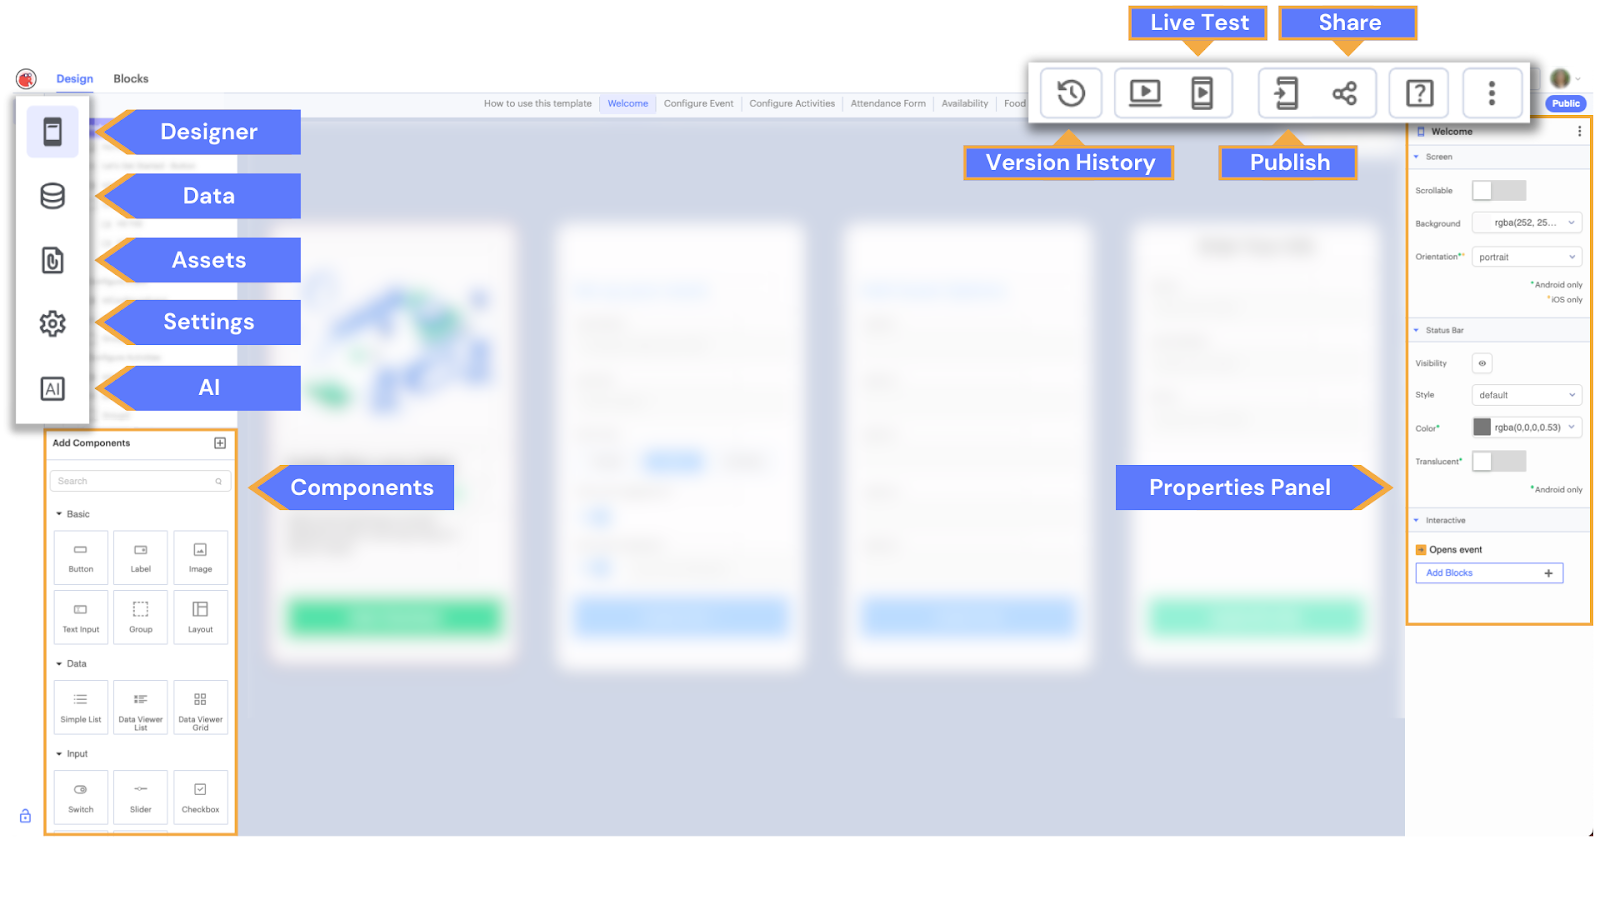
Navigating the Components Library: Make It Yours
Components are the visual building blocks of your Thunkable app. They can help your no code mobile app user interface (UI) look a certain way. Located on the left side of the designer screen, is your components library with 21 different components you can drag and drop onto the design screen. Whether you need a button, an image, a map, or even a component to display data, it's all there, ready to be used.
Each component comes with its own set of customizable features located in the properties panel. You can customize everything, from text to color and position, each element is fully adjustable to suit your app's needs.
Assigning Data Sources: Connect to Your Tools
Most apps need data, and on the left side of your screen, you'll find the place to integrate your data. When a data source powers your app, you can continuously update your app contents without having to republish it. It allows you to build a dynamic app that can create, read, update, and delete data.
You can choose one of the following data sources:
- Google Sheets
- Airtable
- Webflow
- Local Table

For this blog post, we will look at an event planning app and will focus on the Local Table since we want to store our options on the device itself.
Importing Assets: Giving Your App a Branded Look
The assets tab on the left side of your screen is where you can upload images, videos, PDFs, Lottie files, logos, and more for use within your app. Every file added will be included in your app's build package so it'll be available offline. Have your UI built out in Figma? Easily import your already-built UI with our Figma integration.
To learn a little more about how to design a professional app take a look at our blog here.
Testing and Sharing Your Creation: Make it All Come Together
Regularly test your app using the Thunkable Live Test app to refine its look, feel, and function. Collaboration is seamless on Thunkable - share your project with teammates with just a click, fostering a collaborative environment. Once your app is ready, you can publish to the Google Play Store, Apple App Store, and as a web app directly from Thunkable. Publishing capabilities are available to Thunkable Pro, Business, and Team plans.
Thunkable Blocks: Where Your App Gets Its Power
Blocks are the building blocks of your app; you use them to program the actions taken in your no code mobile app efforts. Blocks are what give your no code app action. A beautiful app is important, but blocks are where the magic happens. After you've designed your app, you'll spend your time bringing it to life here.
You can find the logic to build your app in the Blocks tab.
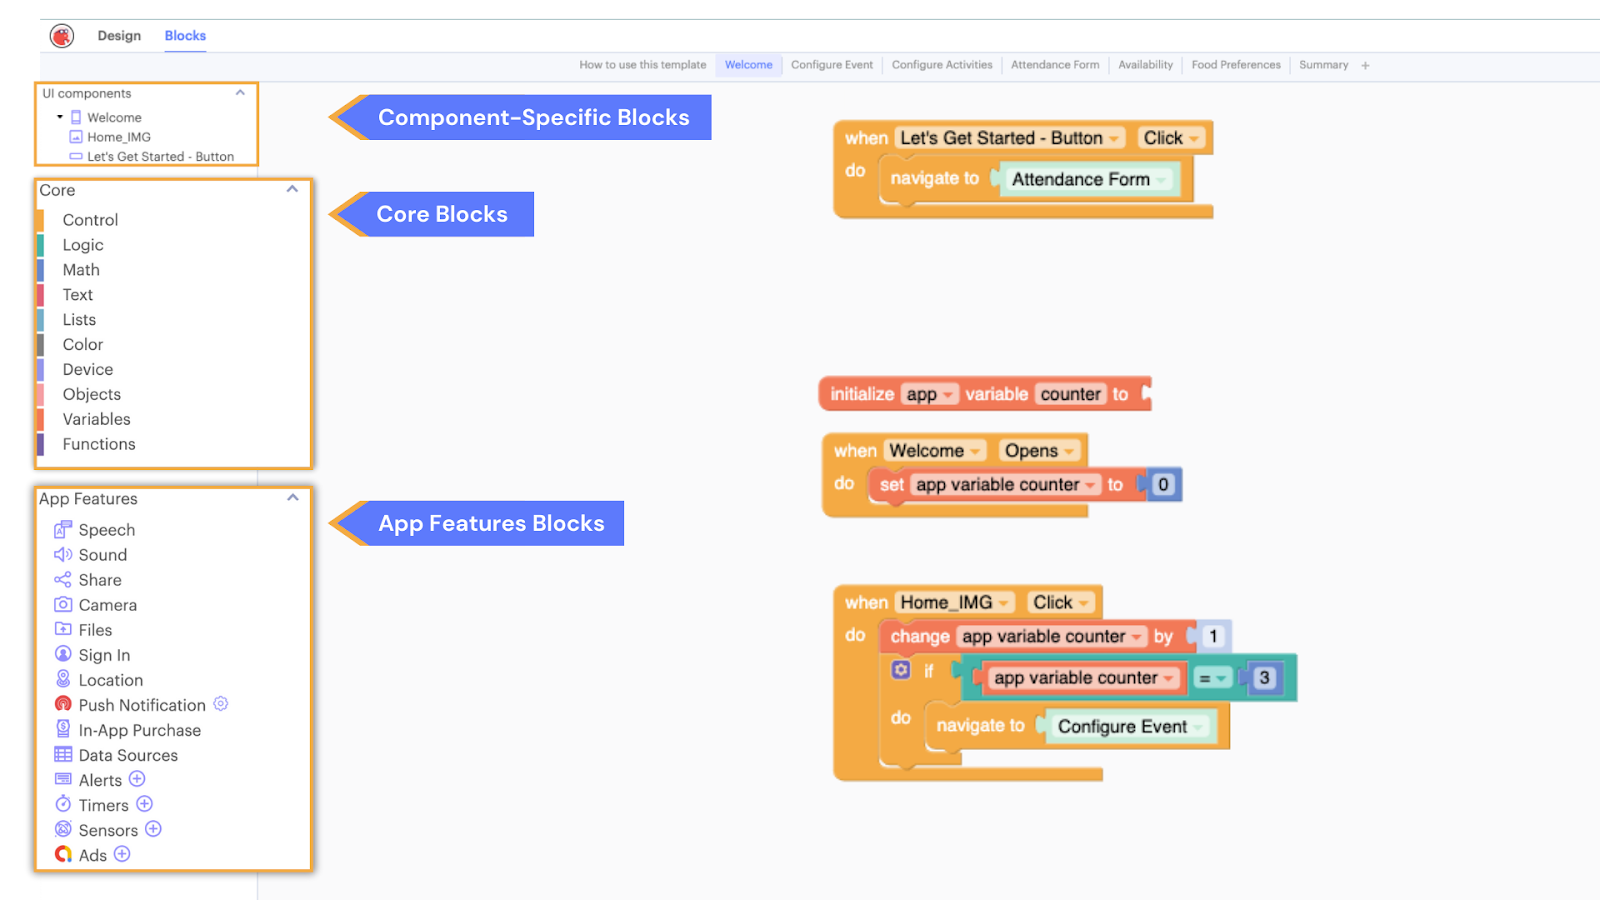
By connecting different blocks, you can define your app's functionality, from simple actions like navigating between screens to more complex tasks like processing data inputs.
Every Component-Specific Block expands to include logic that can start or trigger an event or change properties. Additionally, to make adding logic to your app easy, each block is color-coded to its corresponding function.
Core Blocks are the fundamental building blocks representing basic operations, logic, control structures, or data manipulation functions crucial for creating block code. They include blocks for actions like arithmetic operations, loops, conditionals (such as if-else statements), and variables.
App Features Blocks expand your app’s native mobile functionality. They often relate to your app's functionality and quietly run in the background. Such app features include camera capabilities, location sensors, push notifications, and sharing abilities. For more on Blocks, you can view our docs.
Building Your Event App: Essential Know-How
No need to start from scratch! We have this sample app to get you started quickly so you can easily plan your next event with Thunkable (just hit “Copy Project” on the top right corner to get started!).
To best benefit from customizing this sample app let’s walk you through the screens and its functionality to ensure you have a solid understanding of UI components, variables, data sources, and Thunkable's key features.
Building the User Interface for Each Screen
On the Welcome screen, you want to make it easily recognizable and enticing for the app user. As you can see below, we have used the Image, Label, and Button components to create this first screen.
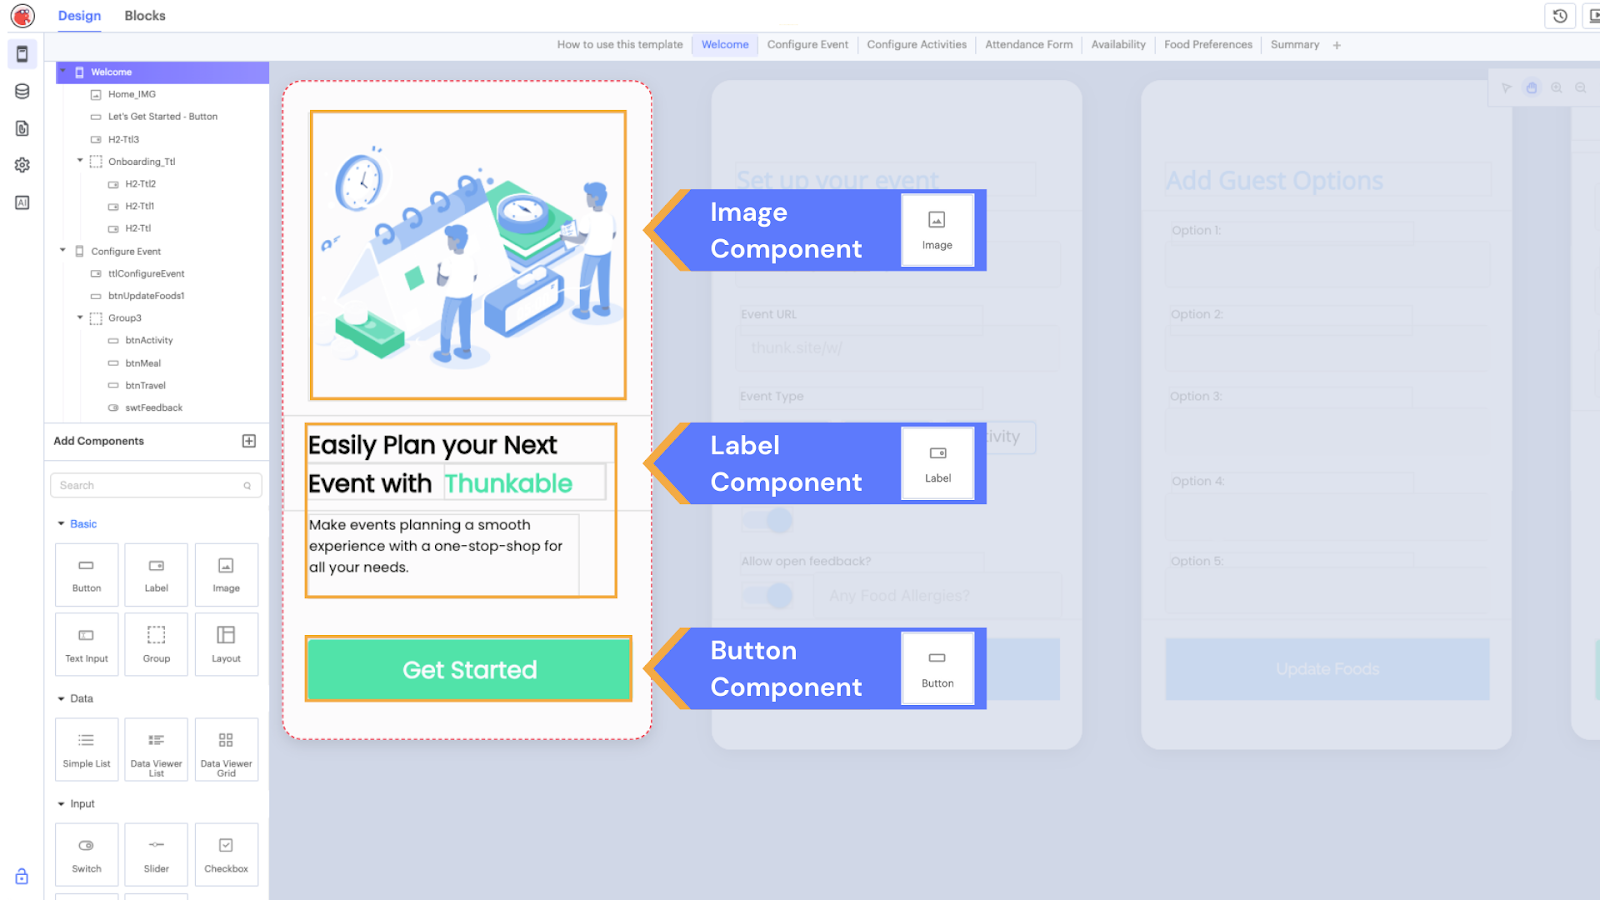
✨ Easily customize this sample app to match your branding or business. For example, instead of using an image to welcome users add an animation instead. You can also upload your logo to your Assets and update the colors and font to match your brand guidelines.
The next screen is where your users can set up the type of event they want. The new components we are using in this screen are the Text Input component for users to enter event-related information and the Switch component to enable user suggestions or feedback within the event app.

With knowledge of each component used in the sample app now you have a better understanding of what each screen contains and how you can customize it better to your needs.
Now let’s take a look at how to add functionality to the app utilizing Blocks.
Adding the Functionality to Your App
Let’s return to the Welcome screen and take a look at the blocks used to add functionality to the button:
- When a user touches the “Get Started” button we want to navigate them to a different screen.
- 2. To do this we will navigate to the component tree and select the “Let’s Get Started” button component to select our functionality.
- Once we’ve selected our correlating block we will select from our Core Blocks the “navigate to” block and add it to our previous selected block.
As you can see by connecting blocks we are building our app’s functionality. You can now select where to send the user after they click the “Let’s Get Started” button.

Within our sample app, we also wanted to provide another navigation option. Why? To provide users with the option to set up new events or add to existing events. Now that we have set up the functionality to direct users to the “Attendance Form,” let’s see how the functionality was built out to direct users to the “Set up your event” screen.
To better understand how this navigation works, let’s talk about variables.
Preparing Your Variables
Variables are placeholders that store and manage different types of information, like numbers or text. They allow you to work with dynamic data throughout the app's blocks, enabling functionality such as displaying real-time information or tracking user interactions.
Variables work in app creation like containers to hold numbers, phrases, calculation results, a database call, or other essential values in the app, the mobile device itself, or the cloud.
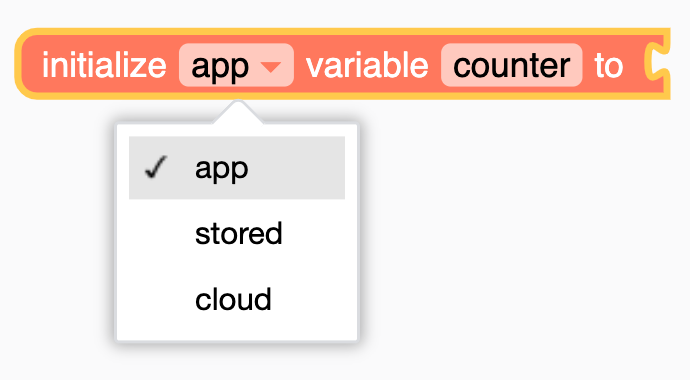
Thunkable has three types of variables for no code mobile app development: app variables, stored variables, and cloud variables. To better understand the role variables have in app development, you can view this video.
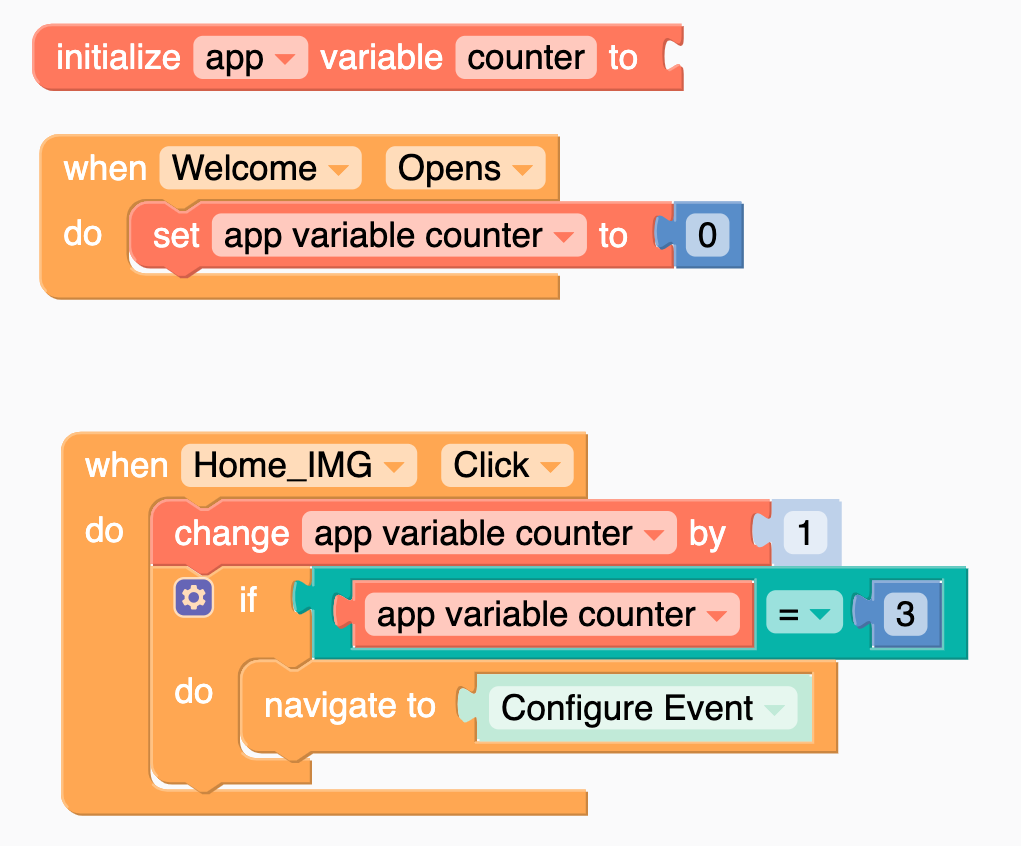
For our Events Planner app, the following blocks are set up to direct the app user to the “Set up your event” page once the welcome image is clicked on three times.
Now that you have a better understanding of variables let’s move on to the next key feature in this sample app.
Understanding Your Data Sources
Data sources are vital in keeping your app content fresh and dynamic. Thunkable allows integration with various data sources like Google Sheets, Airtable, Webflow, and Local Table. For our event app, focusing on the Local Table is advisable as it enables storing options directly on the device.
Thunkable's standout features for event apps include offline capabilities, ensuring functionality in crowded settings, and local data sources for enhanced performance.
As we mentioned previously, we’ll be focusing on a Local Table for our event planner app so users can access these options offline. Let’s take a look at the “Food Preferences” screen where we can understand how our app design, local data source, and block functionality all fit together.
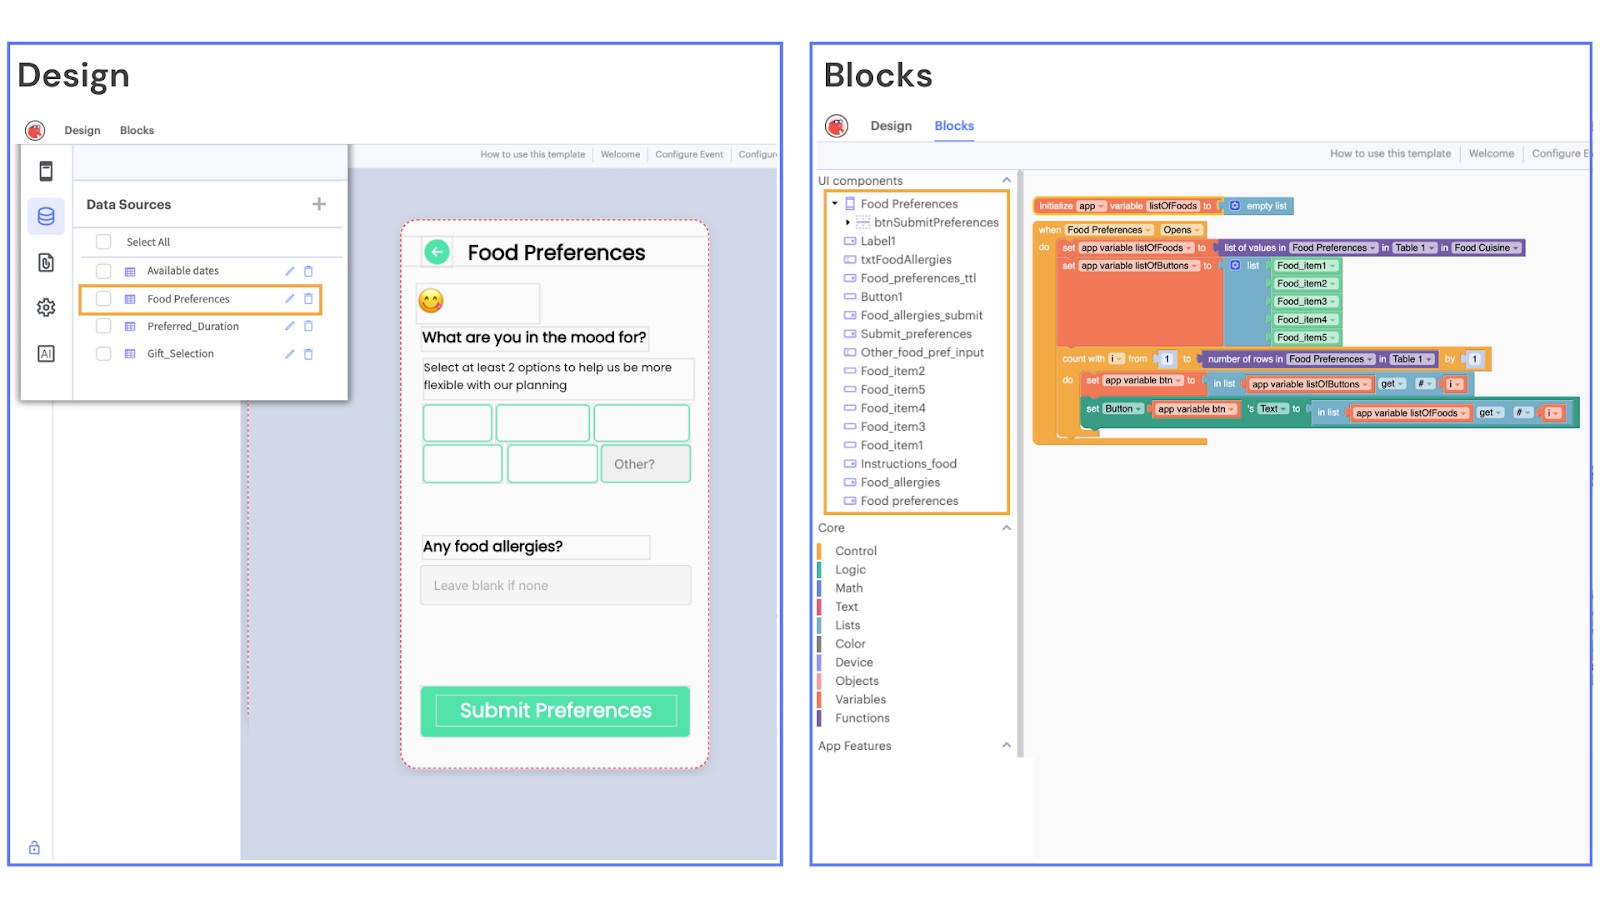
As you can see above we’ve created a data source for our “Food Preferences.” In the Blocks tab,2 we’ve added the functionality to the food options that will appear on the app’s screen. A variable has been created and set for the list of foods. Then the action has been set for when the “Food Preferences” screen opens, the list of values within the “Food Preferences” local table will appear within each food item Button component.
Building functionality on Thunkable is all about understanding how different components interact and how they can be used. If you would like to browse more resources to learn more about the platform:
- Community: Want to connect with other Thunkable Creators? Ask a question and join the conversation in the Community!
- Instructional Videos: Enjoy instructional videos? Check out our library of tutorials available on YouTube.
- Contact our Support Team: Creators on our Pro, Business, and Team plans can click the chat icon in the upper right of a Thunkable Project page to connect with our team.
Building Event Apps for Businesses
Thunkable is an ideal platform for businesses looking to create event apps. Whether it's for a large-scale conference or internal employee engagement, the platform's flexibility allows for a high degree of customization. You can tailor the app to reflect your brand, meet specific event requirements, and create a unique experience for your users.
Building an event app doesn't have to be a daunting task. With Thunkable's no code platform, you have the power to create, customize, and innovate. It's time to bring your event into the digital age with a custom app that delights your attendees and sets your event apart.
Start Your Event Planning App: Use this Showcase App!
Ready to start your journey in no code app development? Sign up on Thunkable’s drag and drop app builder today and explore the limitless possibilities. Also, don't forget to check out our comprehensive ebook, "The Ultimate Guide to No Code Mobile App Development," for more insights and guidance.

View Pricing
If you’re an administrator or requesting multiple licenses for your school or district, our team will follow up with you directly to learn more and help set up the right Education plan. We’ll work with you to make sure Thunkable is the best fit for your districts/classrooms.
We also offer special discounts for individual students and educators. Apply below, and you’ll receive a promo code via email to claim your discounted Thunkable Education plan.
Related Resources


From Idea to App Store: Meet Thunkable AI, the Fastest Way to Build and Launch Mobile Apps

Feature Highlight - Discuss Mode
February 2026 Product Updates
Start
Creating
Creating


Your idea can be live today.